Healthy No Bake Oat Snack Bars
Highlighted under: Wellness Plates
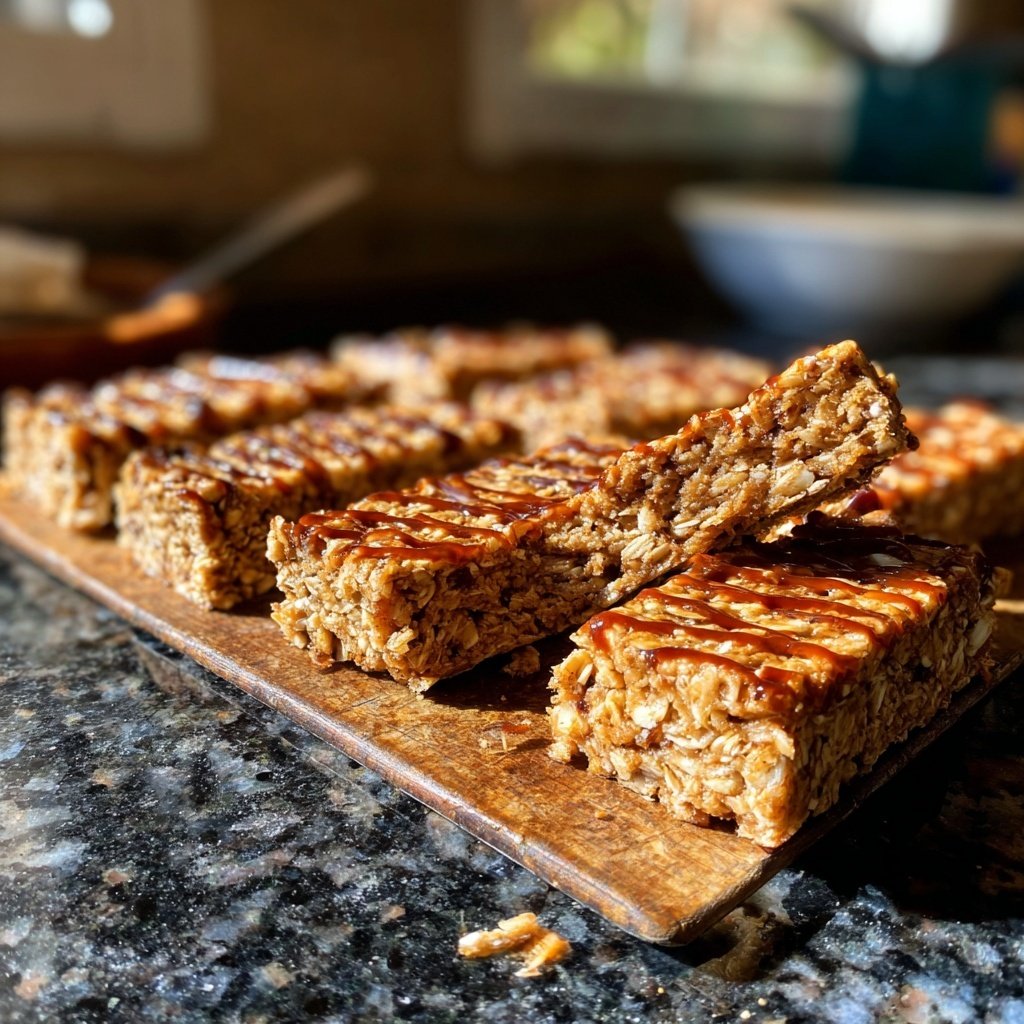
I love whipping up these Healthy No Bake Oat Snack Bars when I need a quick snack that’s both satisfying and nutritious. They’re perfect for busy mornings or as a post-workout treat. With just a few simple ingredients like oats, nut butter, and honey, I find they come together in no time, and the best part? No oven required! These bars are packed with energy and are easy to customize, making them a go-to in my kitchen.
When I first created these Healthy No Bake Oat Snack Bars, I was looking for something wholesome that my family would enjoy. Using rolled oats as the base adds fiber, while the nut butter provides protein and healthy fats. I found that by letting the mixture set in the fridge for just 30 minutes, the bars hold together beautifully and have a satisfying chewiness that my kids love.
Experimentation is key! I’ve tried different add-ins like dried fruits, chocolate chips, and seeds. Each variation offers a new twist, and I especially recommend adding a pinch of sea salt to enhance the sweetness naturally. It’s a healthy snack that never gets old!

Why You'll Love These Snack Bars
- Nutty flavor combined with a touch of sweetness from honey
- A perfect balance of chewy and crunchy textures
- No bake, making them quick and easy to prepare
Understanding the Ingredients
The foundation of these Healthy No Bake Oat Snack Bars is rolled oats, which provide fiber and nutrients that help maintain energy levels. When selecting oats, make sure to use rolled oats rather than instant; the latter may lead to a mushier texture. Rolled oats not only add structure but also absorb moisture, helping the bars hold together without needing any baking.
Nut butter plays a crucial role in imparting flavor and richness while also acting as a binding agent. Peanut, almond, or cashew butter each adds a unique taste profile, so choose based on your personal preference. If you're looking for a lighter option, a sunflower seed butter can be a great nut-free alternative, ensuring that everyone can enjoy these bars.
Tips for Perfect Texture
Achieving the right texture is essential for these snack bars. When pressing the mixture into the baking dish, use a flat spatula or your hands to compact it firmly. This step is vital because a well-compressed mixture will prevent the bars from crumbling once cut. To get a really even surface, consider placing a second piece of parchment paper on top while pressing down.
If you notice the mixture feels too dry, a bit more nut butter or honey can help. Conversely, if it seems too wet and struggles to hold shape, additional oats can be folded in. Always aim for a sticky but cohesive mixture: it should hold together but not feel overly greasy.
Make-Ahead and Storage Tips
These snack bars are perfect for meal prep! Once cut, they can be stored in an airtight container in the refrigerator for up to one week. For longer storage, consider freezing them. Just wrap each bar individually in parchment paper, place them in a resealable bag, and they can last up to three months in the freezer. When ready to eat, let them thaw overnight in the fridge.
Serving these bars fresh is ideal, but if you're looking to add even more flavor or nutrients, consider drizzling melted dark chocolate over the top before chilling. This not only enhances the snacking experience but can also elevate the visual appeal, making them great for sharing!
Ingredients
Gather these simple ingredients to make your snack bars:
Ingredients
- 2 cups rolled oats
- 1/2 cup nut butter (peanut, almond, or cashew)
- 1/3 cup honey or maple syrup
- 1/4 cup mini chocolate chips (optional)
- 1/4 cup chopped nuts (optional)
- 1/4 cup dried fruit (raisins or cranberries, optional)
- 1/2 teaspoon vanilla extract
- Pinch of salt
Mix these ingredients well for a delicious and healthy snack!
Instructions
Follow these simple steps to prepare your oat snack bars:
Mix Ingredients
In a large bowl, combine the rolled oats, nut butter, honey, and vanilla extract. Stir until evenly mixed.
Add Optional Ingredients
If you’re using nuts, chocolate chips, or dried fruit, fold them into the mixture until well incorporated.
Press into Pan
Line an 8x8 inch baking dish with parchment paper. Press the mixture firmly into the pan, spreading it evenly across the surface.
Chill and Cut
Refrigerate the pan for about 30 minutes to allow the bars to firm up. Once set, remove from the pan and cut into bars.
Store the bars in an airtight container in the refrigerator for up to one week.
Pro Tips
- For added flavor, consider experimenting with spices like cinnamon or adding protein powder to boost the nutritional content.
Customizing Your Bars
One of the best aspects of these no bake bars is their versatility. You can easily swap out ingredients to match your dietary preferences or to use what you have on hand. For instance, if you don't have honey, maple syrup serves as an excellent alternative, providing similar sweetness with a different flavor profile.
Adding spices like cinnamon or nutmeg can also elevate the flavor without adding calories. Additionally, you can experiment with the types of dried fruit; apricots, figs, or even diced apple can lend a delightful chewiness and extra nutrients to the bars. Don’t hesitate to get creative!
Serving Suggestions
These bars make for an excellent on-the-go snack, but they can also be enjoyed in various ways. I often crumble them over yogurt for breakfast or a quick dessert, adding a nutritious crunch. Topping them with fresh fruit or a dollop of nut butter can take your snack to the next level.
For a fun twist, consider creating a parfait with layers of these snack bars, yogurt, and berries. This makes for a visually appealing and filling treat that’s great for brunch gatherings. The possibilities are endless!
Troubleshooting Common Issues
If your bars are too crumbly after cutting, it likely means they weren't compacted enough during preparation. When making these bars in the future, take extra care to press the mixture firmly into the pan; using a flat tool can help with even pressure. Also, ensure you’re using the recommended amount of nut butter as it serves as the adhesive.
Conversely, if you encounter sticky bars that are hard to slice, it may be due to an excess of moisture, perhaps too much nut butter or syrup. In this case, trying a bit more oats next time can help. Find your balance through experimentation; every kitchen is unique!
Questions About Recipes
→ Can I substitute the nut butter?
Yes! You can use sunflower seed butter or any other nut-free option.
→ How long will the bars last?
They can last about a week in the refrigerator if stored properly.
→ Can I freeze these bars?
Absolutely! Just wrap them individually and they can be frozen for up to three months.
→ What can I add for extra flavor?
Feel free to add spices like cinnamon or mix in cocoa powder for a chocolatey version!
Healthy No Bake Oat Snack Bars
What You'll Need
Ingredients
- 2 cups rolled oats
- 1/2 cup nut butter (peanut, almond, or cashew)
- 1/3 cup honey or maple syrup
- 1/4 cup mini chocolate chips (optional)
- 1/4 cup chopped nuts (optional)
- 1/4 cup dried fruit (raisins or cranberries, optional)
- 1/2 teaspoon vanilla extract
- Pinch of salt
How-To Steps
In a large bowl, combine the rolled oats, nut butter, honey, and vanilla extract. Stir until evenly mixed.
If you’re using nuts, chocolate chips, or dried fruit, fold them into the mixture until well incorporated.
Line an 8x8 inch baking dish with parchment paper. Press the mixture firmly into the pan, spreading it evenly across the surface.
Refrigerate the pan for about 30 minutes to allow the bars to firm up. Once set, remove from the pan and cut into bars.
Extra Tips
- For added flavor, consider experimenting with spices like cinnamon or adding protein powder to boost the nutritional content.
Nutritional Breakdown (Per Serving)
- Calories: 150 kcal
- Total Fat: 7g
- Saturated Fat: 1g
- Cholesterol: 0mg
- Sodium: 10mg
- Total Carbohydrates: 18g
- Dietary Fiber: 2g
- Sugars: 6g
- Protein: 4g